01 09 10

Thursday, April 25, 2013

Wash Day


I was talking to my daughter on the telephone this morning and asked what she was doing.  She replied in a not so joyful voice, “You know the usual, washing clothes.”  I told her that sounded exciting and she informed me in a sarcastic voice, “It is great folding whites.”

                Its not that she was complaining, it was just something we all do.  Washing clothes at home is somewhat of a chore and defiantly not as exciting as the TV shows which never show anyone washing and folding clothes.  They are too busy solving crimes going to parties or just having fun.  I did comment the other day to my husband that I never see the stars working a boring job or cleaning their spotless house.

                I suppose I look on washing clothes at home different than some others would.  I remember as a little girl going to the Laundromat.  I don’t remember if our washer was broken or we didn’t have one.  We would load up the clothes, usually a week’s worth into the car then unload it into the big rolling carts at the Laundromat - then sort and load into the washing machine.  Hopefully you didn’t have to wait for someone else to get done with the washers.  Then came drying time, by that time you were thinking of all the things you could be doing somewhere else.  Then folding the laundry and putting them back into the clothes baskets to load back in the car and take home.

                I lived for 6 years off the grid.  The only electricity I had came out of a small and I mean small generator.  I used a washer almost identical to the above picture.  I couldn’t have a larger washer because the motor on the washing machine was too big for the small generator.  Do you know buttons get ripped off or crushed while going through the wringer?   

                Maybe that is why I look upon washing clothes in my wonderful electric washer at home as a privilege.   Not that there are not other things I would like to be doing, but that what I am doing is a luxury you might say.  So the next time you are doing your wash in your shinny electric machine at home, think how very lucky you are…


Wednesday, April 24, 2013

I like muffins, they are a easy quick bread I can make that and add about any fruit or nut and make delicious.  What better than to have a warm muffin at breakfast or dinner to bring the old home feeling to your meal.  Just remember that when you are mixing the dough up to not over mix.  Mix it just enough to blend it together.


BLUEBERRY OR CHERRY MUFFINS


Cherry Muffins or Blueberry Muffins

1 Cup whole wheat flour
1 Cup white flour
1/8 to 1/4 cup sugar (or you can use honey)
4 teaspoons baking powder
About 2 Tablespoons canola or vegetable oil
2 eggs
About 1 cup of milk.  If you use white flour only use less milk

Combine ingredients (don’t mix too much).
Put cherries or blueberries into muffin cups.  I use frozen cherries as I don’t usually have fresh cherries around.
If you want to put blueberries in put as many as you want into the batter before putting into the muffin pans.
Put into well greased muffin pans, should make about 12 muffins
Bake 450 degrees for 15 minutes.

Tuesday, April 23, 2013

Canning Raspberry Jam

Raspberry jam

Spring is here and around the corner will come the berries.  This is the Raspberry jam recipe I use.  One thing that I always suggest is to check with your local Farm Bureau agency to get recipes for canning and drying for your area.
Remember you can skip the wax and put canning lids on your jars and cold pack them for a few minutes to make sure they seal.
  If you decide to put your jam in the local county fair you might want to skip the wax as some judges dock points for putting wax on your jam.


Raspberry Jam
Prepare your jars and lids the same as the apricot jam recipe. Wash your raspberries (ants seem to love raspberries). If you have currents or other types of berries these help the raspberries go farther and make a wonderful mixture of berries.
I put my raspberries in a large measuring cup a little at a time and barely crush with a potato masher. I want to just make sure they are broke down but not liquid. When you have measured out 5 cups of crushed berries put in canning pan and add 1 package of pectin, Ball and Kerr both have a good pectin or you may buy the liquid type. I usually double my bath even though they say not to, cuts down on the time for me which is very valuable.
Bring raspberries and pectin to a boil over low to medium heat.
After the mixture starts to boil you add your sugar. Have your sugar premeasured and ready to pour in. It makes the process go smoothly. The Ball pectin recipe calls for 7 cups of sugar, I use only 5 cups and that seems more then enough for me. You have to cook the jam longer but I like my jam a little runny, as I said with the apricot jam recipe, I don't like my jam to be cement.
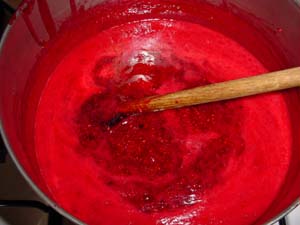
When the raspberries come to a boil again (keep on low to medium heat) and make sure you stir it so it doesn't stick to the bottom and burn. Boil until it has thickened to the consistency of where when you drop it out of a wooden spoon it comes on with a little thickness, not runny. To me it reminds me of a bad case of cellulite (sorry about the description but the best I can do without showing you in person).
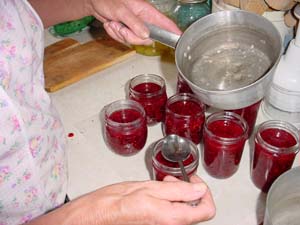
Ladle into jars like I have described above in the apricot jam recipe, put on wax if you desire, wash the rim and put on caps and lids. Let sit for 24 hours before washing and labeling. I like to label on the lid instead of the jar so I can just throw my lid away and not have to scrub the labels off the jars next year. The least amount of work when I am canning the better!!
We are not responsible for any recipe or food problems you may incur while canning. This is a recipe I use, you may try it if you like but I am not responsible for any damage or problems you encounter while canning, this is just a recipe that has been working for me for many years.
Homemade Raspberry and Apricot Jam
jars and wax ready to put on jam
Jars lids and wax for making jam.
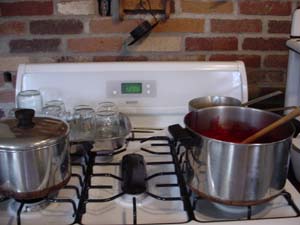
I organize my jars, double burner for wax, canning lids in covered pot with boiling (simmering) hot water to sterilize them also. When the jam is ready, so are all the other things.
putting wax on jars
Putting Wax on Jars
I use about 3 tablespoons of wax per jar. You might have a better way to do it, I just use an old tablespoon.

You can never be too careful with wax. Always use a double boiler when heating wax, never put it directly on the heat. It will get hot and start on fire. Also never put hot wax in water, it can explode and cause severe burns. 

          Always keep handles away from where children can reach, you wouldn't want them to knock over hot pans and burn themselves. This stuff is hot and can cause severe burns. With care you can have a wonderful time and enjoy the fruits of your labor throughout the year. Read instructions on wax packaging.

Caution: Wax will ignite if overheated or exposed to open flame. To avoid danger and to preserve the quality of the wax, always check instructions on the wax you buy. Never put wax in pan directly over heat, preferably use a double boiler.


The steam from the water bath can also cause bad burns.

This is supposed to be a good experience so always take precautions with yourself and especially when children are around, keep them away from hot pans and syrup..

Never throw hot or burning wax in water, it will explode! I repeat,

NEVER THROW HOT OR BURNING WAX IN WATER, IT WILL EXPLODE!!!
I repeat

NEVER THROW HOT OR BURNING WAX IN WATER, IT WILL EXPLODE (all over and on your face)!!!

If you don't want to use wax, when jam is done put jam in canning jars, adjust lids and boil in a water bath. Bring to a boil and let boil in canner for 10 minutes. Cool for 5 minutes, open lid and cool again before taking out bottles. I let my bottles cool some before taking out of the bath then put on a clean towel and cover with a towel. Let set at least a day before labeling and putting away. I always put my labels on the lid so when I want to reuse the bottles I don't have to scrape labels off the jars.


Monday, April 22, 2013

MOTHER DAUGHTER APRONS


     Old Fashioned Matching Mother Daughter Aprons.
Remember when you used to wear an apron in the kitchen with our Mom or Grandma?  With Mothers Day coming up what better way to enjoy it than with matching Mother Daughter Aprons  The above aprons are shown in the girl aprons, the woman apron matches except the pockets are square.
     This pretty Retro apron style comes in three sizes for girls and four sizes for women, size small to extra large (at Stitch Thru Time they don't believe one size fits all.) 
You can find these pretty aprons at www.stitchthrutime.com

Friday, April 19, 2013

Smoothies and fruit juice recipes

 
Start your day off with a fruit drink in the morning or enjoy one throughout the day.  Here are some fun recipes you might enjoy.  You can substitute the ice cream or sherbet for yogurt.


BERRY BANANA
3/4 cup apple juice
1 banana
1/2 cup blueberries
1/2 cup frozen yogurt
1/2 cup raspberry sherbet
1/2 cup ice

3 TIME BERRY JUICE
1/4 cup. raspberry juice
1 cup nectar
1 cup strawberries
1 cup raspberries
1 cup blueberries
1 cup ice


KIWI with RASPBERRIES
3/4 cup Kiwi juice
1 cup strawberries
1/2 cup raspberries
1  cup raspberry sherbet
1/2 cup ice

MANGO and PINEAPPLE
3/4 cup Mango-passion juice
1 1/2 cup mangos
1 cup pineapple sherbet
1/2 cup ice

MANGO ORANGE JUICE AND PEACHES
1/4 cup orange juice
1 cup peach nectar
1 cup mangos
1 cup peaches
1/2 cup ice
CHERRIES and RASPBERRIES JUICE
1/4 oz. raspberry juice
1/2 cup soymilk (or low fat milk)
1 cup cherries

Wednesday, April 17, 2013

Going Green

 
Perhaps I started out at a very young age thinking green.
  In the 20th century they didn't consider it going green, it was called mowing the lawn. 
 
As I grew older I still used the old push lawn mower to mow the lawn much to my sons distress.  We were the only people on the block, perhaps the whole town who didn't have a power mower.  When it was time to mow the lawn we got out our push lawn mower.  If I had lived in a gated community I could have started as early or gone as late as I wanted because there was no loud roar of the mower, only a quiet whirl as the blades went around. 
 
 Perhaps my lawns were not quite as manicured as the neighbors, but they were green.  I would always do a good base of manure, saw dust and anything available at the time before I planted grass or laid sod so I didn't need to water as often.  I would water ever few days a good watering and have a good lawn with deep roots.
 
I still mow my lawn with a push lawn mower, but not in my dress and good shoes.  Just be sure and oil it good before you start!

Tuesday, April 16, 2013

How to hang out clothes on the clothesline.

I found this old picture in my family photos - she is taking the clothes off the line on a cold afternoon.
 
There should be a handbook on hanging up clothes.  Anyone who has hung out clothes for years knows there is a special technique you develop after many years of spending time under the clothesline.  I have been hanging out clothes since I can remember.  I started at my Grandmother's who never had a dryer.  She would hang out her clothes year round unless it was so cold the clothes would freeze and I am sure she hung out some then. 

You need to have something to transport them from the washing machine to the clothesline.  I suggest a sturdy clothes basket, one that you can put on your hip so you don't carry all the weight in your arms, somewhat like carrying your child.  Next you need some good clothes pins. Sad to say all the good clothes pin manufactures in America have gone out of business so all we are left with are the cheap clothes pins made out of the country.  Try to pick as study as clothes pins as you can get.  I use the clothespins that have a spring; they seem to hold the clothes better.

When you get your clothes out of your basket shake them out first, don’t just put them on the clothes line.  I hang the shirts up by the bottom and put two clothes pins in the first item.  The next item overlap the edge, I use the second clothes pin from the first thing I hung up and use it as one of the clothespins on the second item and add another clothespin to hang secure the other end.  You just keep going until you get to the end of your line.  In other wards you don’t need two clothespins for every item you hang up, only two the first item then one for the other ones after that because you are using the second clothespin from your first item as the first clothes pin on your second item.  You still have two clothes pins in each item but they overlap each other, it saves room and clothespins.  I hang my clothes this way UNLESS it is winter time and cold - on heavy shirts and other clothing that is thick I don’t overlap them because it takes longer to dry in colder months.  In the summer and warmer times it doesn’t matter if they overlap the edge of the material as they dry quickly.

When you hang up sheets, table cloths or other large items make sure you put in more than two clothes pins, the wind may come up and blow it off if not secure.

When I hang up pants I use two clothes pins on each of them I don’t overlap them unless they are thinner material.  You can either lay them over or hang them up by the bottom of the pant leg.

Another thing I do is hang the longer items first and the shorter items last.  If the sun is shining I want it to not shade my clothes so the shorter ones in front (closer to the sun) give the ones in back of them the warmth of the sun more directly.

If here was a clothes hanging contest I am sure I would win hanging up clothes and taking them off the clothes line, you get pretty quick when you have hung out clothes on the clothesline as long as I have.